Illuminate Your Home: Guide to the Perfect C9 Christmas Light Installation
Last year alone, countless hours were lost in untangling light strings and replacing burnt-out incandescent bulbs. And let's not even talk about the perilous dance with ladders along roof lines. But what if I told you that this year could be different?
This isn't just about making your neighbors green with envy over your light display. It’s about reclaiming peace during what should be the most wonderful time of the year. So forget those frustrating afternoons spent fighting with zip ties and extension ladders.
Imagine a world where setting up Christmas lights is as easy as flipping a switch, because maybe, just maybe, it can be.
Table of Contents:
- Choosing the Right C9 Christmas Lights
- Preparing for Installation
- Installing C9 Lights Along Gutters
- Extending Your Display Across the Roof
- Managing Wire Length and Obstacles
- Adding Special Lighting Effects
- Conclusion
Choosing the Right C9 Christmas Lights
When it comes to creating a stunning outdoor holiday display, choosing the right C9 Christmas lights is key. And let me tell you, hard plastic LED C9 bulbs are the way to go.
Traditional glass C9 bulbs? They're fragile, prone to breaking, and just not built to withstand the elements. But hard plastic LED C9 bulbs? They're designed to look great but with the added durability that comes with plastic.
Trust me, when you're hanging lights outside in the cold, wind, and rain, you want bulbs that can take a beating. And that's exactly what you get with LED C9s.
Moreover, they're available in an array of hues and designs, enabling you to craft the ideal ambiance for your dwelling. Whether you want classic white, festive red and green, or even fun novelty designs, there's a LED C9 bulb out there for you. Here is a list of the types of C9's we carry:
Faceted C9 bulbs: Great all around bulb. The light is reflected offering a bright outward look.
Ceramic Style C9 bulbs: The light is absorbed, to create a warm glow, much like the 1950's style painted glass bulbs.
Filament C9 Bulbs: These are designed to look like the old Edison style light bulbs, where you can see a glowing filament in the bulb.
So when you're shopping for your outdoor Christmas lights this year, don't settle for fragile glass bulbs. Choose the durability and versatility of LED C9s instead. Your holiday display (and your stress levels) will thank you.
Preparing for Installation
Before you start hanging your C9 Christmas lights, there are a few key steps to take. Believe me, investing a bit of time in preparation can significantly streamline the setup process and reduce any potential headaches.
First things first: gather your materials. You don't want to be halfway up the ladder only to realize you're missing something crucial.
Measuring Your Space
To figure out how many feet of C9 socket wire you'll need, break out the tape measure. Measure along the gutters, rooflines, and any other areas where you plan to hang lights.
Don't forget to account for a little slack in the wire. You'll need this to navigate around obstacles like flashing without putting too much strain on the wire.
Gathering Materials
Once you have your measurements, it's time to shop. The C9 wire comes in 25, 50, 100, 500, and 1,000-foot lengths, so choose the one that best fits your needs.
While you're at it, stock up on these essential supplies:
- Plastic roof clips for hanging lights along gutters and sliding under shingles
- male, female and Inline plugs for adding special lighting effects like cascading light tubes
- SPT-1 wire to make jumper cords between peaks and gutters.
- Extra bulbs
My advice? Err on the side of having too much rather than too little. There's nothing worse than having to pause midway through the installation for an emergency hardware store run.
With your space measured and materials gathered, you're well on your way to a stunning holiday light display. Next up: the fun part - installation.
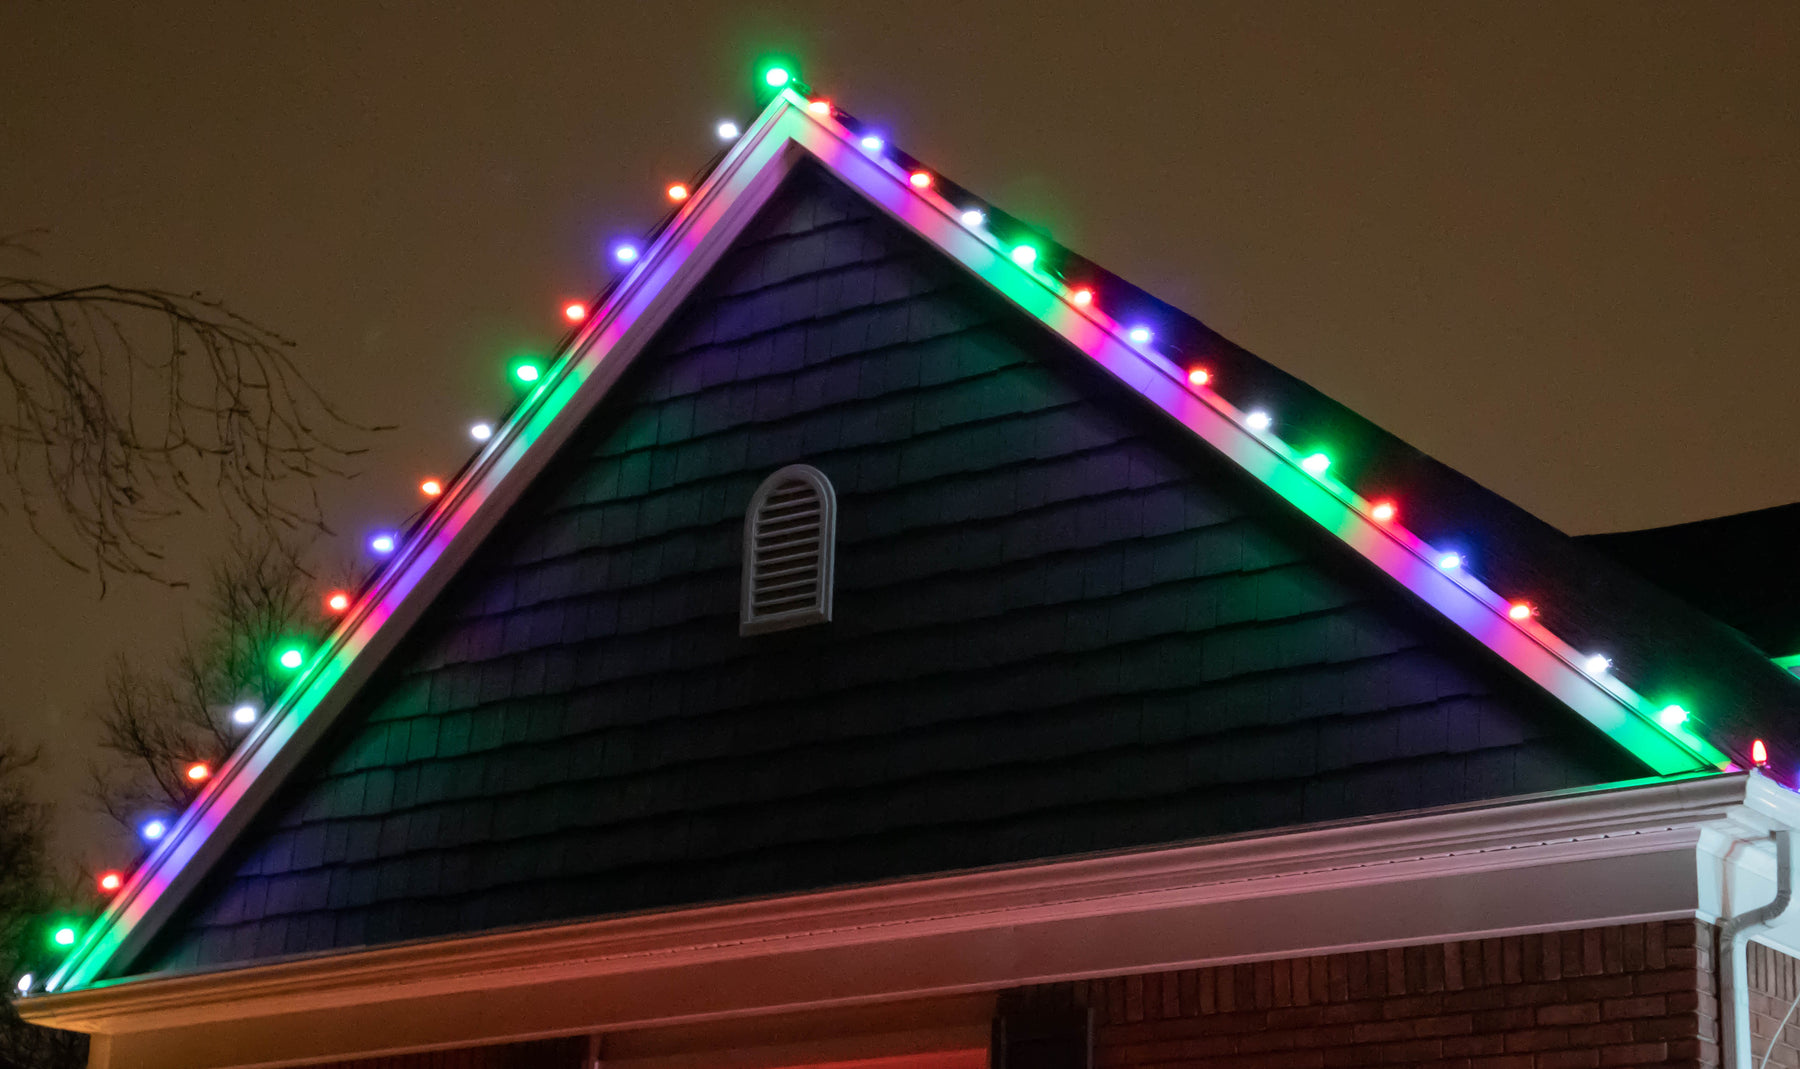
Installing C9 Lights Along Gutters
Want to know the secret to a clean, safe, and stunning holiday light display? It's all in the installation. And when it comes to hanging those C9 bulbs along your gutters, I've got you covered.
Mastering the art of securing those C9 bulbs hinges on the clever utilization of plastic rooftop clips. These handy little gadgets make it a breeze to securely attach your C9 lights to your gutters or even slide them right under your shingles. I highly recommend the circle clips as they make removal very easy.
No more worrying about your lights sagging, drooping, or worse - falling off completely. With plastic roof clips, your display will stay put all season long.
Here's how to do it:
- Start by attaching the clips to your C9 bulbs and socket wire.
- Next, simply hang the clips onto your gutter or slide them under your shingles, depending on your preference and roof type.
- Make sure each clip is securely fastened and your wire is taut, but not so tight that it puts strain on the clips or your gutters.
- Continue along the length of your gutter, adjusting and securing the clips as needed to ensure a straight, even line of lights.
And there you have it. A professional-looking C9 light installation that will make your home the envy of the neighborhood.
Ready to take your holiday lighting game to the next level? Grab some plastic roof clips and C9 bulbs and let's get started.
Key Takeaway:
For a pro holiday light display, use plastic roof clips to easily secure C9 bulbs along gutters or under shingles. It's quick, safe, and keeps your lights looking great all season.
Extending Your Display Across the Roof
You've got your gutters looking gorgeous with those C9 lights. But why stop there? Let's keep the party going and extend that display right onto your roof.
It's easier than you think. You can use the same trusty clips you used for the gutters, just turn 'em the other way and slide them under your shingles. Boom, bulbs secured on the roof.
Transitioning Techniques
At this point, you might be wondering how to navigate from the gutter to the roof seamlessly without it appearing awkward. "But how do I smoothly move from the gutter to the roof without it looking all janky?" I got you covered.
There are two slick ways to make that transition:
- Back out a bulb. Just unscrew one of those babies and voila, you've got a seamless transition from gutter to roof. No one will even notice.
- Use a SPT-1 wire to make a patch wire. You can seamlessly link up and hide these patch cables. Attach male and female plugs on each end the the wire and you have an instant extension cord that is easy to hide.
So go ahead, extend that display and make your house the envy of the neighborhood. With these techniques, your transition from gutter to roof will be smooth and look like a professional installer did the job.
And don't forget, you can grab C9 wire in all sorts of lengths to fit your needs. We're talking 25, 50, 100, 500, even 1,000 feet. The possibilities are endless.
So what are you waiting for? Get out there and start spreading that holiday cheer across your entire roofline. Your house will thank you, and so will your neighbors (even if they're secretly jealous).
Managing Wire Length and Obstacles
When it comes to installing your C9 Christmas lights, you're bound to run into a few obstacles. However, facing these challenges shouldn't deter you from assembling the festive showcase you've always envisioned.
The key is to leave some slack in the wire when you encounter things like flashing. By doing this, you evenly spread out the load and avert any harm. Honestly, giving your wires a bit of breathing room not only ensures your illuminations remain dazzling throughout the season but also wards off any potential wear and tear.
Cutting Wire to Length
One of the best things about C9 bulk wire is that it can be cut to the perfect length for your project. No more dealing with excess wire or coming up short.
Here's how to do it safely:
- Unplug the lights, no one like to get electrocuted!
- Measure the area where you'll be installing the lights and add a few extra feet for slack. It's best to install the lights, then cut off the extra, vs measuring and hoping you did it correctly.
- Use a pair of wire cutters to carefully snip the wire at your desired length.
- Connect the plug to the end of the wire and you're created a custom length strand.
By cutting your wire to the perfect length, you'll avoid the hassle of dealing with too much or too little wire. Plus, it'll make your display look cleaner and more professional.
So don't be afraid to break out those wire cutters and get your C9 lights just right. With a little planning and some careful cutting, you'll be on your way to a stunning holiday display in no time.
Adding Special Lighting Effects
Want to take your C9 Christmas light display to the next level? Cascading light tubes are the answer.
These mesmerizing tubes create a stunning waterfall effect that'll make your house the talk of the neighborhood. And the best part? They're super easy to set up.
How to Incorporate Cascading Light Tubes
Cascading light tubes can be seamlessly added to your existing C9 wire using an inline plug or by using the C9 version of the tubes. It's as simple as plugging them in and watching the magic happen.
Here are a few tips to keep in mind when setting up your cascading light tubes:
- Make sure to space out the tubes evenly along your C9 wire for a balanced look.
- Secure the tubes to your roof or gutter using zip ties or clips to prevent them from blowing around in the wind.
- Consider using a timer to automatically turn your cascading light tubes on and off at designated times.
Creating a Cohesive Display
While cascading light tubes are sure to be a standout feature, it's important to integrate them into your overall display seamlessly. Here are a few ideas:
- Choose cascading light tubes in colors that complement your existing C9 Christmas lights.
- Highlight your home's unique design, like its peaks or columns, by strategically placing those tubes to catch the eye.
- Incorporate the tubes into a larger theme, such as a winter wonderland or Santa's workshop.
With a little creativity and some cascading light tubes, your Christmas light display will be the envy of the block. So go ahead and add some extra sparkle to your holiday season.
Conclusion
So, we've danced through the twinkling world of Christmas lights together. From choosing the unbreakable charm of LED C9 bulbs to mastering the art of hanging them just right along your gutters and roof.
This journey wasn't about outshining your neighbor (okay, maybe a little). It was about turning chaos into harmony during the holiday season. Now you know that setting up Christmas lights doesn’t have to be a dreaded chore filled with tangled wires and precarious ladder maneuvers.
You've now got all the secrets tucked under your belt, making this year’s light show smoother than ever before. And remember: when those first snowflakes start falling against the backdrop of perfectly hung lights, take a moment. Breathe it in because this—this is what makes braving cold fingers and toes worth it every single time.
Here's to lighting up more than just our homes but also our spirits — one bulb at a time!
Leave a comment